

In this article, we will guide you on how to adjust your stock counts on Deskera App Store.
Follow the steps as mentioned below to make necessary stock adjustments:
1. Click on the Apps on the sidebar menu. Select the Stock Adjustment Application and click on the 'Get this app' button.
2. Next, in your Stock Adjustment App, you should be able to map all the Track Products, Warehouse, inventory, and Invoice information to Deskera Books.
3. Ensure that you are connected to your Deskera Account by clicking on the 'Connect' button. If the status shows as Connected means you have already logged into your respective account via Deskera Marketplace.
4. In the Stock Adjustment Application, click on the stock adjustment button on the sidebar menu and you will be directed to the stock adjustment page.
5. Click on the button on the top right of the page to create a new stock adjustment.
6. This will open a window and you will need to fill in the fields as stated on the image below:

- Date: Select the stock adjustment date from the calendar
- Warehouse: Select the warehouse from where the stock needs to be adjusted
- Type: From the drop-down menu select the stock type (Stock In/Stock Out)
- Reason: From the drop-down menu select the reason to Damage/Shrinkage/Stock Take/Other
- Product Name: Select the product name mapped as per product created on Deskera Books
- Quantity: Add the number of stocks to be adjusted
- Available Quantity: It is the total of Total stock available in the Source warehouse - Total number of stock transferred.
- Total Value: Is auto-calculated as per the total stock adjustment quantity and price mapped for the product in Deskera Books
- Notes: Mention the stock adjustment notes if any
7. Lastly, click on the Save button to create a new stock transfer.
This stock Adjustment will get reflected in the invoice created for the product selected, once you do the fulfillment of the invoice.
Edit Stock Adjustment Information

After creating the Stock adjustment, and if you want to make any changes, you have an option to Edit the Stock adjustment information.
Click on the three vertical dots on the created Stock adjustment on the right side corner, an Edit option will appear where you will be able to change the information.
By clicking on the Print button you will be able to print the Stock transfer assessment form.
Export Report
On the top right side of the page, you can see an Export option where you can fetch the Stock adjustment details in an Excel format.
Filter Information
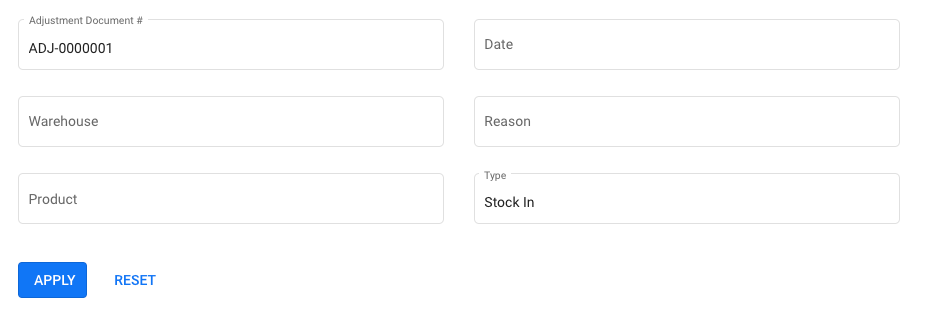
You will be able to view the Stock Adjustment information either with Adjustment Document number, Date, Warehouse, Reason, Product, and Type, by clicking on the Filter button.
Once you have selected the above filter options click on the Apply button to view the details.
You also can set the different filters by just clicking the Reset button.