

As the admin of the system, you will need to create different types of leaves to classify the reasons why the employee uses their leaves into groups. This type of leave needs to be created before the onboarding process of your staff so that they are aware of what they are entitled to once they joined.
In every organization, it's quite standard to have emergency leave, annual leave, and medical leave. To add more types of leaves in the system, follow the steps as mentioned:
1. Go to the 'Settings' tab >> Click on the 'Leave Management' tab.

2. Click on the '+ New Leave Type' button.
3. A pop-up will appear, and the admin will have to fill in the fields as shown:
A) Under Details Section
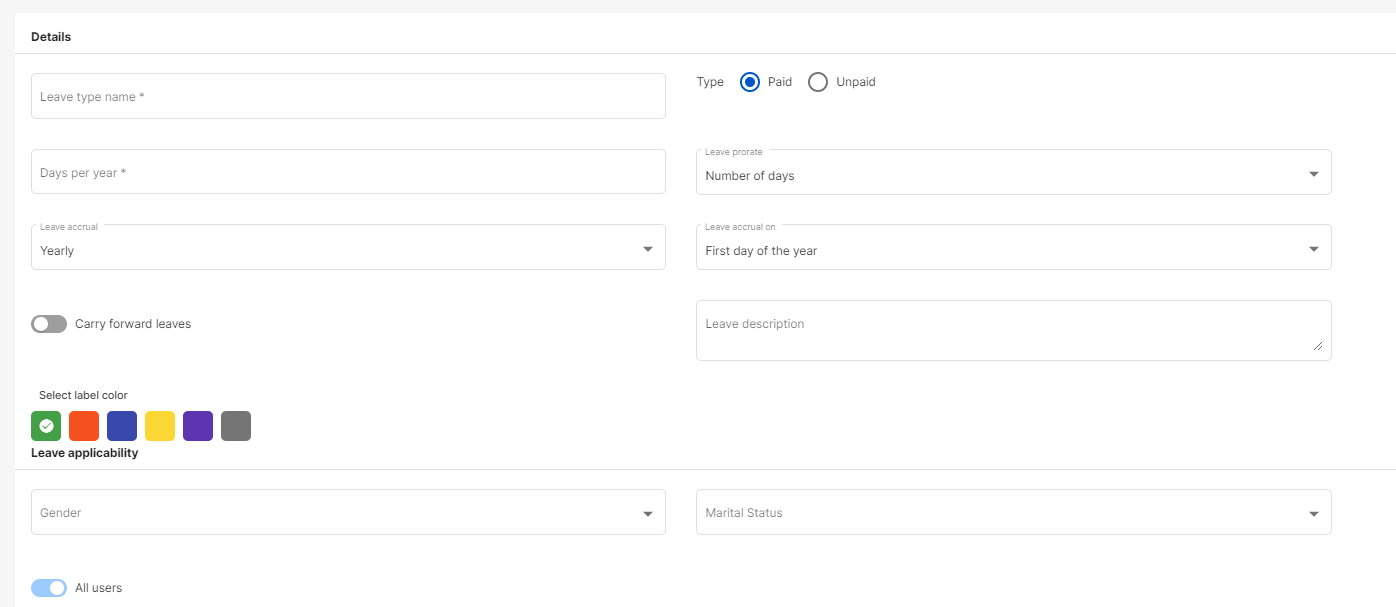
- Leave Type Name - Enter Leave Type Name
- Type - Select if leave type is Paid/Unpaid
- Days Per Year - Enter the Number of days per year for leave type
- Leave pro-rate - Select Number of Months, Number of Days, Disabled
- Leave accrual- Select either, One-time, Monthly, Yearly
- Leave accrual from - From the drop box select the option First day of the year
- Enable or disable the carry forward leave- If enabled, enter both the carry forward leave days and maximum leave balances
- You have an option to select the label color
B) Under Leave applicability Section- Select the Gender and Marital Status
Click here to find out more

Select the leave applicability by,
- Gender
- Marital Status
- All users - Use the toggle button if applicable to any particular users or all users.
C) Additional Leave Configuration - Add maximum calculation days and you can also enable to option to Active leaves and Apply before confirmation date.
Also you can enable the button if you want to allow for unpaid leaves

D) Years of Service Based Entitlement -
If you enable to YOS basis entitlement you need to fill in the below information

- YOS Range
- Number of Leave
- Carry Forward Leaves
You can always add a new YOS Range by clicking on the +Add YOS Range buton.
After all these details are filled in click on the 'Save' button at the top right of the page.
View, edit and delete Leave types created
To view the type of leave you have created,

Go to the Leave Management Summary.
To make the changes in the leave type, click on the the leave type checkbox. Then click on the edit icon, an editable leave type window will appear where you can make the changes in the required fields.
To remove the leave type from the system, click on the Delete icon. Under the status column, untick the active checkbox to change it to inactive mode.
Finally, you can apply this new type of leave to specific teams or users in the system.
Congratulations! You have successfully created a new type of leave in the Deskera eLeave system.