Incorrect invoices cause as much as 61% of late payments.
That’s why as a small business owner, one of the most important financial tasks you’ll have to master is how to make an invoice.
With premade invoice templates and invoicing software, this process is as easy as 1, 2, 3. But if you want to go the extra mile, you can also choose to manually create your invoices from scratch.
In this article, we will explain how to make an invoice using all three methods, blank paper, invoice templates, and automated invoicing software, along with the best practice that saves your business time and money.
Read on to learn about:
- What Is an Invoice - Definition
- What Are the Main Elements of an Invoice?
- How to Make an Invoice [Step-by-Step with Examples]
- Professional Invoice Templates
- How to Create a Professional Invoice Using Deskera [Step-by-Step]
- Making an Invoice FAQ
What Is an Invoice - Definition
An invoice, also known as a sales invoice or a business invoice, is the document issued from seller to buyer, to request payment for a product or service. Essentially, it helps your business receive timely payments, track inventory, as well as develop trusting, long-term relations with customers.
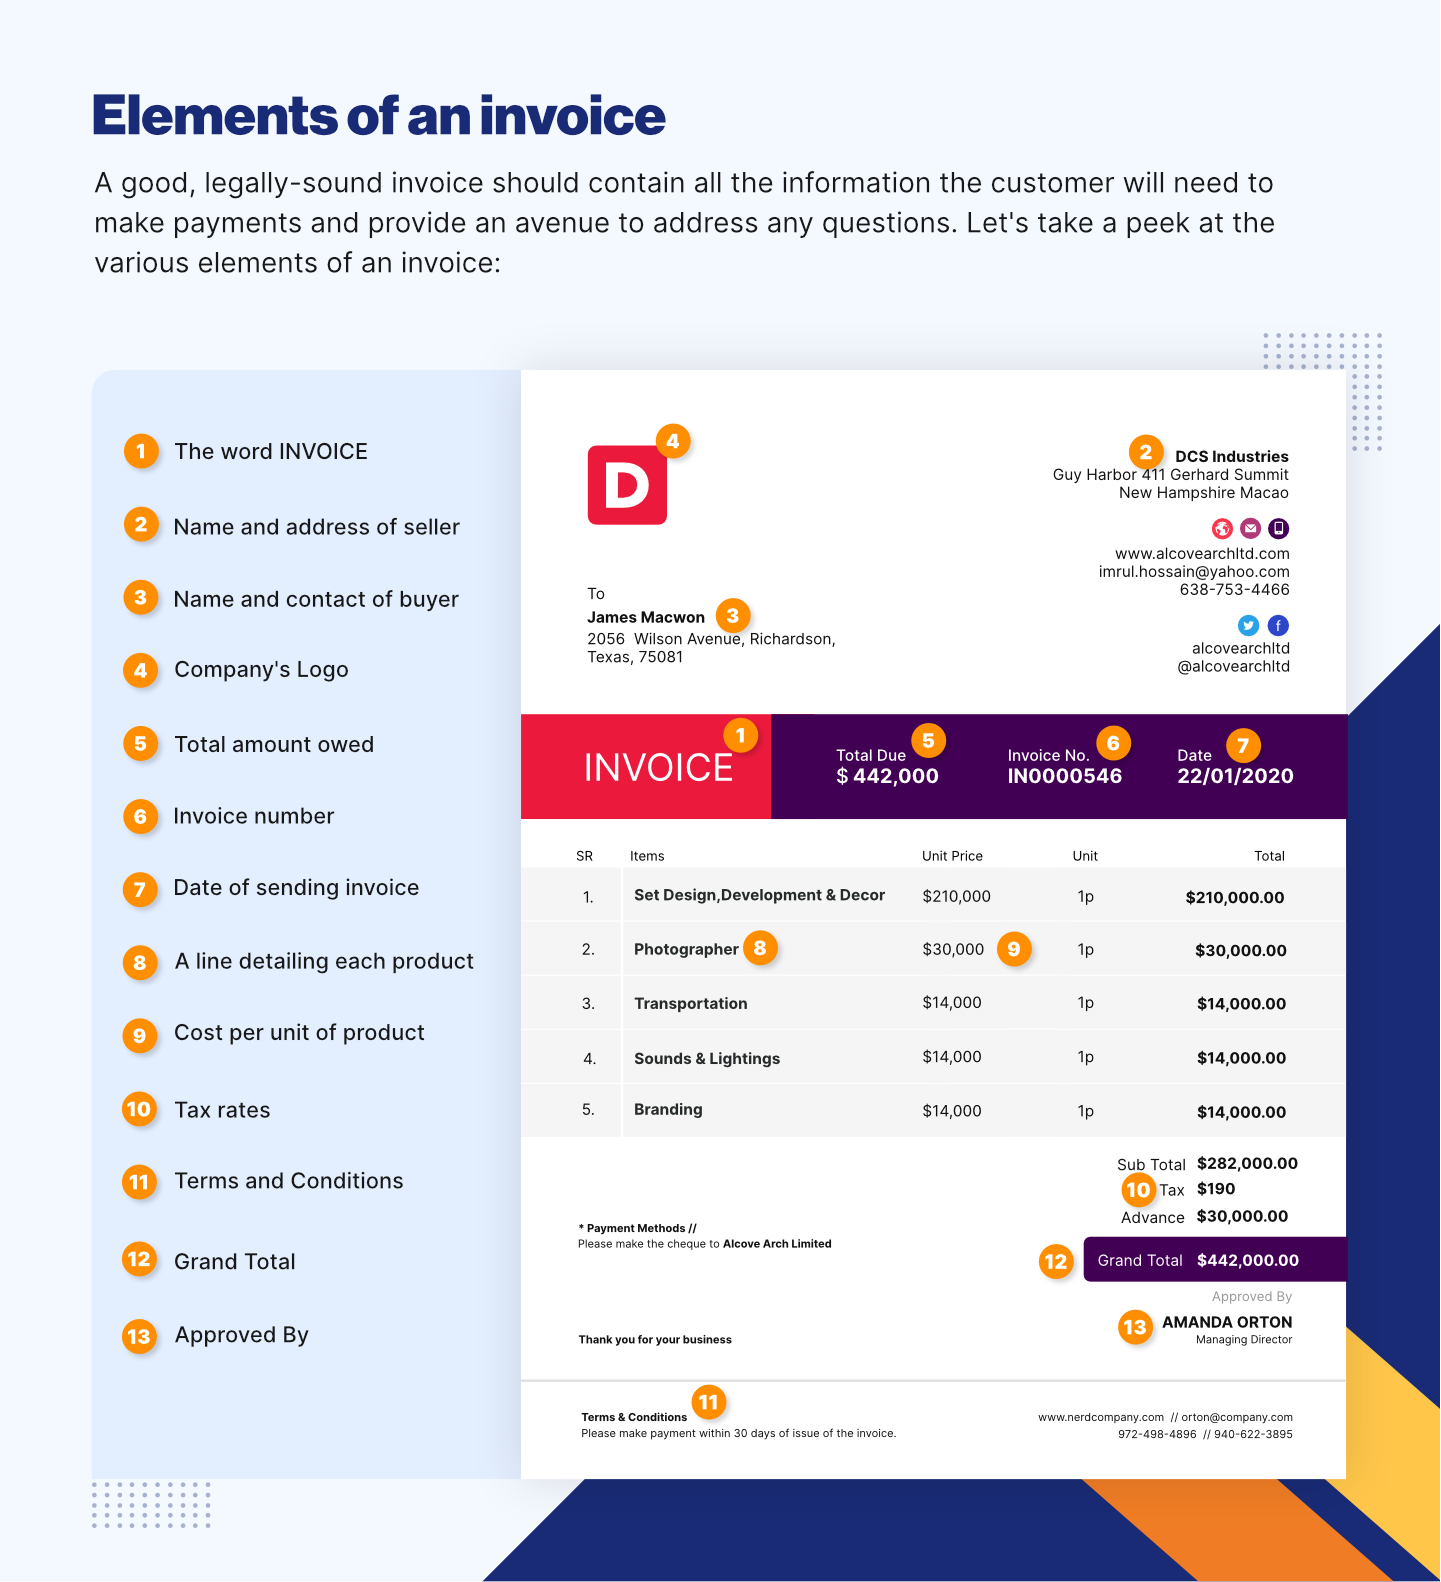
What Are the Main Elements of an Invoice?
Although there are different types of invoices, the core elements an invoice requires to be considered a legally-binding document are:
- Header with the word “Invoice”
- Business and client contact details
- Invoice number
- Name and description of the product or service
- Cost per unit and the total amount
- Billing date
- Due date
- Terms of payment
Now that you know what the main elements of an invoice are, let’s dive into the nits and grits of creating a professional invoice for your business.
Not sure what type of accounting system to use for creating invoices and doing accounting for your business? Check out our complete guide on accounting systems.
How to Make An Invoice [Step-by-Step with Examples]
If you want to start from square one and manually create an invoice for your business without using an invoice template, you’ll need to follow these steps:
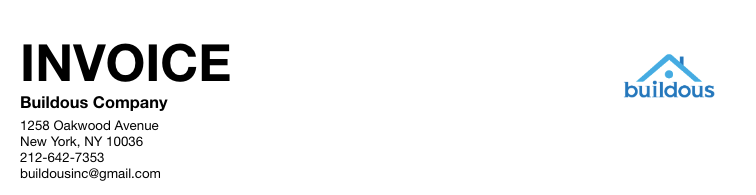
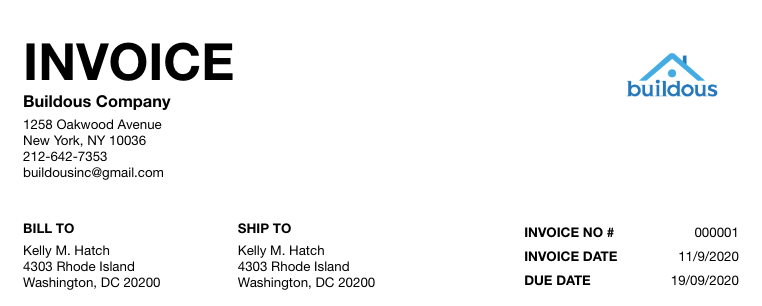
Step 1: Create a Professional Invoice Header
A professional invoice header needs to include two main elements, the word “invoice” at the top of the page and all of your business’ contact information.
Your business contact details include:
- The name of the business
- Logo. If your business name is part of the logo, you can just use the logo instead.
- Address of the business
- Business phone number
Here’s an example of an invoice header with all of the above elements:
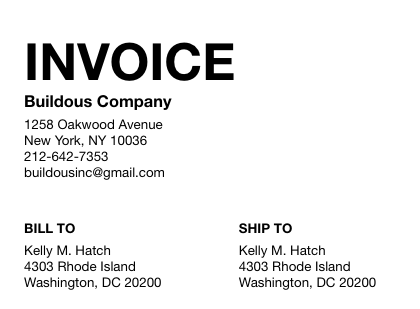
Step 2: Write the Client’s Contact Information
Directly below your business details, write down the recipient’s contact information. These include the client name, as well as their shipping and billing address. You can also add their phone number and email, but this step is optional.
After you’ve completed step 1 and 2, your work-in-progress invoice should look like this:
Step 3: Choose an Invoice Numbering System
Every invoice has a unique invoice number (also known as reference number or invoice ID) at the top of the document. This number keeps invoices organized, helps avoid any duplicate payments, and makes tracking easier for tax season.
There are several methods of generating an invoice number, but the most common one businesses use is sequential. With sequential numbering, you just move up by one with every new invoice. For example, if your first invoice is recorded as 000001, the next one would be 000002, and so on.
If you want to learn more about the different ways you can assign invoice numbers, head over to our guide on - What Is An Invoice Number And How To Generate It.
Pro-tip
Don’t want to manually number your invoices? Use invoicing software like Deskera to automatically generate your invoice numbers, every time a new sale is made.
Step 4: Specify the Dates
There are two important dates you have to include in an invoice: the date the invoice was issued and the payment due date. The due date depends on previous agreements you might have had with the client. If you haven’t had any, just go with the standard billing period of your business.
Write both dates on a separate line, right under the invoice number, somewhere on top of the document, just like in the example below:
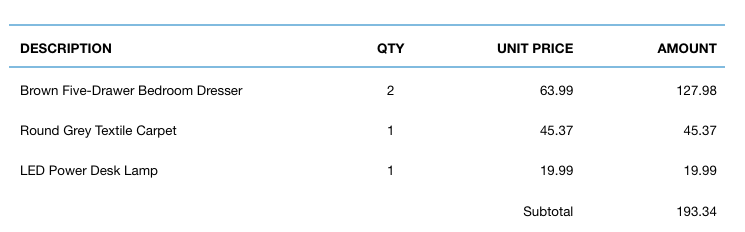
Step 5: Create an Itemized List of Products and Services
To be as professional and transparent as possible, include an itemized list of all of the products and services you expect payment for. The easiest method is creating a table where you list the following items:
- Description of the product or service.
- Quantity of products or service. If your business provides a service and charges for the hour, enter the number of hours you’re charging the client.
- Unit price or rate. Again, if you’re charging by the hour, here you write how much the rate per hour is.
- Total for each service and subtotal. After you sum up the totals for every line of product or service, add them up together to calculate the subtotal for the entire invoice.
Here’s an example of an itemized list of products:
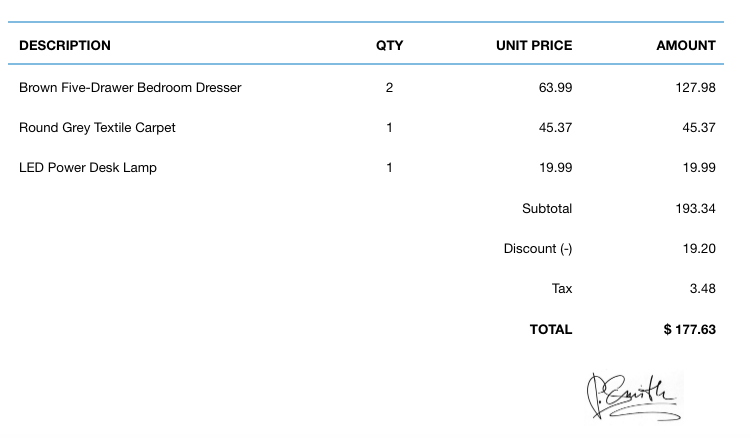
Step 6: List Discounts and Taxes
After you’ve found the subtotal, add any discounts or applicable taxes to it.
Tax requirements depend on the type of business and your location. Do some research, and contact your local IRS office to find out how much you should tax your clients.
Alternatively, you can use tax compliant accounting software like Deskera to completely automate the process of applying taxes to your products or services. Deskera has inbuilt tax rules that make tax calculation seem like a walk in the park. But don’t just take our word for it.
Sign and up and create your invoice with Deskera in just a couple of minutes.
After applying both discounts and taxes, calculate the total, and end the invoice with a signature.
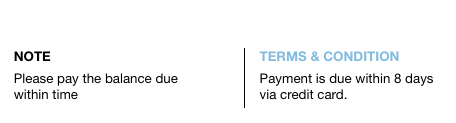
Step 7: Add Notes and Payment Terms
At the bottom of the page, write down your payment terms.
Payment terms include clear details about when the payment is due, along with your preferred method of payment such as cash, check, credit card, or any other. If you charge late fees, you can add that information here too.
Then, right next to the payment terms, you can also add a note to the buyer. This step isn’t necessary, but a note that includes a simple “thank you” or “please” might help the business get paid faster.
And you’re done!
By now, you should know how to make an invoice for your business. And this is what the full invoice with all of the above elements would look like:
Professional Invoice Templates
As previously mentioned, manually creating an invoice from scratch isn’t your only option.
You can also choose from hundreds of premade templates online, and personalize them with your brand colors and logo.
Microsoft Word and Google Docs Invoice Templates
Both Word and Google Docs provide a gallery of templates, where you can type “invoice” in the search box to get access to the invoice templates.

These templates are free and easy to access, but the cheapest option might not always be the best one for your business.
For starters, free templates aren’t very professional-looking and can be hard to customize.
And then everytime you make some small change to the invoice, its format gets scrambled, and you end up wasting 10 minutes on a single invoice.
All in all, the process of creating an invoice in Word or Google Docs can quickly turn into a stressful and time-consuming one.
Why waste time on something so simple as creating an invoice, when you could be spending that time on running your business?
That’s why most businesses nowadays use accounting and invoicing software to automate the process of making an invoice. With invoicing software, all you have to do is pick an invoice template, customize it with your brand and company info, and hit send.
And next time you create an invoice, you can simply reuse the previously customized template.
Deskera Invoice Templates
Deskera offers over 100+ free professional templates, you can tailor to your business with the preferred color scheme, business logo, signature, and more. And this can be done within seconds, from wherever you are - phone, tablet, or desktop.
All you have to do is choose the preferred template, personalize it with the business’ brand, fill in the appropriate invoice elements, and you’re done!
Then, you can download, print, or send the invoice with one click. Just like that, your invoice is on its way to the client!
How to Create a Professional Invoice Using Deskera [Step-by-Step]
Creating a professional invoice with Deskera is as easy as 1-2-3.
Head over to the Deskera invoice generator and pick your preferred invoice template. You can pick from over 100+ different professional invoice templates, all of which you’ll find on the right sidebar.
After you’ve picked your template, head over to the left side of the page, where you’ll find another sidebar that allows you to customize the invoice with your brand colors and company logo.
On that same sidebar, you can scroll down and enter the appropriate invoice details, such as the invoice number, business name and address, client contact info and billing information, due date, order details, payment terms, and any additional notes.
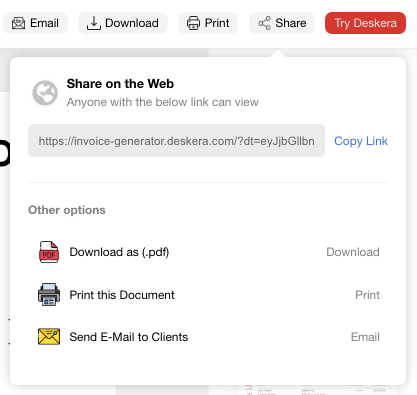
Once you’ve finished adding all your invoice elements, it’s finally time to share your document and get paid! Press Share on the top right of the page, to download, print, or email the invoice to your client.
And that’s how you automate invoice creation with Deskera. The best part: the software comes at a very affordable price of $9 per month.
You can even give it a try right away, with our completely free trial! No credit card details required.
Making an Invoice FAQ
When Is the Best Time to Send Out an Invoice?
The most common approach is to send out the invoice right after the work is done, or within 48 hours of finishing.
However, there are certain cases you may consider doing it before the job is done. For example, if you’re dealing with a large-scale project that requires a deposit, or the client has a history of not paying back on time.
Is an Invoice a Bill?
An invoice and a bill are documents that contain similar information, at least in regard to the amount that is owed. However, an invoice is a term used by a business that is trying to collect money for a product or a service they have provided. Whereas the term bill is used by customers to refer to the money owed for something they have purchased.
Should I Include Credit Card Information in an Invoice?
No, your identity could be easily stolen. If you’re going to include the card, only enter the last four digits.
What to Do When an Invoice Payment is Late?
Send out a late invoice payment reminder email, or give the customer a polite call to chase after the payment.
If the client doesn’t pay back at all, you have the right to make a formal demand, and then serve a legal complaint.
Key Takeaways
And that’s a wrap! We hope you found our guide to making an invoice helpful.
For a quick recap, let’s go through the main points we’ve covered:
- An invoice is a document that requests payment for services and allows your business to get paid.
- There are 7 main steps to creating a professional invoice:
- Create a professional header
- Write the client’s contact information
- Choose an invoice numbering system
- Specify the due date and billing date
- Create an itemized list of products and services
- List any discounts and taxes
- Add payment terms and any other notes
- Use cloud accounting software like Deskera to create professional invoices within seconds.
Related Articles